Making plans
Not alot of real work today, but a few more things crossed off the list, and a bunch of plans made.
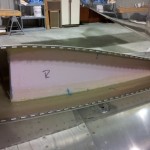
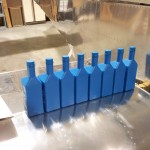
Added a fillet of flox to the wingtip foam ribs, followed by a strip of glass tape. Because it was so warm today (mid- to upper-90′s), the epoxy kicked quite fast and generated some heat. That caused a tiny wave to form in the fiberglass tip above one spot where the flox was particularly thick, but you can’t really see it unless you know where to look, and the light is right. It’ll be super easy to fix in the prep & finishing of the tips, anyway. Set the tips aside to cure, and they should be installable tomorrow, possibly for the last time before flight.
Cleaned up a few drips of oil from yesterday’s engine work, and added 8 quarts of the prescribed oil for break-in (Phillips X/C 20W50, which is also the recommended regular operating oil by ECI).
So, the plans…I called a bunch of people today to start working on details moving toward first flight.
- Tim Mahoney (DAR)…talked about paperwork, fees, and test flight area. He advised me on the process, and that I should call the Minneapolis MIDO and request their amateur-built packet, which contains some forms unique to their office that aren’t available from the FAA website. The basic outline of the process:
- Get the packet from the MIDO
- Fill out the forms to the best of my ability
- Call Tim and he’ll go over the forms with me and make sure they’re correct
- Submit the paperwork to the MIDO
- Wait a few days and call them to make sure they received and processed it
- Call Tim and he will obtain the paperwork from the MIDO, look it over, and assign a test flight area
- Arrange with Tim to come and do the inspection
- Pay the DAR fee
- Minneapolis MIDO…the woman who knows how to put together the amateur-built packets is out of the office all week, but the guy who answered the phone will give her my name and address when she gets back. Alrighty, then.
- Jim, my hangarmate, also an A&P…we’re going to get together tomorrow morning to look over the FWF install in preparation for first engine start.
- Tom Berge, transition trainer & test pilot…preliminary arrangements made to have him do a thorough inspection on July 8, and reserved the entire week of July 23 for transition training. Because of my low hours, I need to get 15 hours of RV-A dual. Knowing the impact my flight lessons have on the weather, it will storm the entire week. We talked for quite awhile and Tom had several suggestions, which I give weight to, given his experience building & flying these things:
- The oil pump will do a fine job of oiling the engine to prepare for start, nothing fancy required. Put oil in, pull top or bottom plugs, and spin it until you have oil pressure. Put plugs in, man the extinguisher, and fire away.
- Make sure to have the purge valve selected to ‘Purge’ when spinning the engine to get oil pressure, as the fuel pump will be pumping fuel!
- Once flooded, it’s a pain to unflood the engine. Lycomings will almost always start (but not necessarily run) at ICO, so start there and richen as necessary.
- Remember to turn on the ignitions, they start better that way.
- Make sure the dataplate and paperwork match.
- Double-check the N numbers to make sure they really are 3″ tall.
- The danger of ground runs is heat…keep them to a minimum to avoid glazing. FAA may want something different, it’s a conflict.
- These aren’t one-off designs, we’re not really testing the airframe/design, we’re testing systems. Two exceptions:
- Checking that the skid ball is centered
- Checking for a heavy wing
- Install wheel pants & fairings for first flight & break-in, rather than waiting until later.
- The “more drag to make the break in easier while flying slower” argument is BS.
- Better cooling (which comes with increased airflow through the cowling, which comes with higher airspeed) is more important…again, heat is the enemy.
- Look at the current OAT (99 at RGK today) and think about it.
- (This argument makes alot of sense, even if I hate fiberglass…)
- Strongly recommend installing a backup airspeed indicator.
- My panel has only one source of AS info, the EFIS.
- No GPS groundspeed fallback (only GPS display is currently on EFIS).
- Screen failures can and do happen.
- AS is the critical instrument to back up…altitude you can manage by looking out the window.
- Gauge marked with ranges for the airframe isn’t a bad idea (Van’s sells them).
- Eventually want a stickon to cover the backup or it will be a crutch and won’t learn to read the EFIS.
So, lots to think about, and several more items to add to the list. I had a 2.25″ hole cut into my panel, which is currently blanked out, for “future expansion”…from the dimensional drawing online, it looks like the UMA analog indicator Van’s sells will fit in that spot without clearance problems (the concern is depth due to the canopy frame). If it doesn’t, MGL makes some digital gauges that are relatively affordable, and quite shallow.
And yes, more fiberglass work on the list.


