17th
June
2007
Began riveting the right HS this afternoon. Clecoed the nose ribs in place, followed by riveting them from the front to the rear. What an awful space to try and drive your first “real” rivets! Managed to escape with only a couple minor dings on the bottom side, mid nose rib, and a couple drilled out rivets. (Allison helped for a short while–she does well, but could use a bit more confidence. I do have to say that both of the dings were my fault…)
After the nose ribs were in, riveted the no. 2 & 4 main ribs to the front spar, clecoed that into place, and riveted the rib-spar-nose rib joints. Pulled rivets on the center rib required flexing the main rib out of the way to get clearance for the nose of the puller. No problem-o. Clecoed the skin to the ribs and called it a night.


Many thanks to my wife, who let me rivet (and even came out to help) on our first anniversary. 
Hours: 3.7 | Posted in Horiz. Stabilizer |
16th
June
2007
Squeezed the front & rear HS spars after dinner. I really like using the pneumatic squeezer, the ability to set it up and have a whole row of repeatably good rivets is very nice. The “longeron” yoke is my favorite so far; I also have a 2″ and a 4″ no-hole.
Hours: 1.0 | Posted in Horiz. Stabilizer |
16th
June
2007
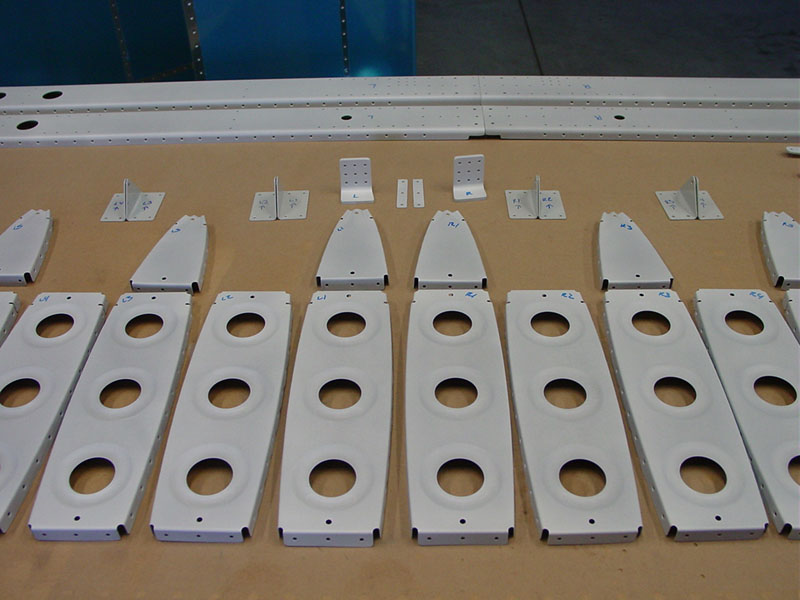
Spent the morning priming parts; it felt like it was taking time, but when I came inside for lunch, everything was done, and it was hardly one o’clock. The priming table worked nicely, the spray gun did fine once I mastered its adjustments, and the wind was cooperative. I had some trouble with the gun initially, it didn’t want to spray much regardless of what knobs I twiddled. It had worked fine with some test fluid (water) last night when I was playing in the shop, but didn’t want to spray much paint at all. I pulled the filter out of the bottom of the cup and it worked fine. I don’t know if the filter is too fine, or what, but it seems to have been restricting the flow of paint far too much. Worked fine after that (I did double-filter the paint on the way into the cup).
Set up the parts, the first coat is a light fog coat. Dry for five minutes, then recoat with more material, says the label. I worked my way around the table, then started back at the beginning; plenty of time to dry that way. I turned the fluid knob out 1/4 turn for the second coat. The parts aren’t dripping in paint (you imagine that you can still see the aluminum through it a bit), but they seem to have a good even coverage and sheen. There’s some speckling going on in the coating, I don’t know whether it’s undissolved solids, or dust, or bad atomization, or stuff settling on the coating while it dries. It’s very small, whatever it is, and doesn’t seem like it would affect anything, so I’m not going to worry about it, and try tweaking the gun some more on the next batch of parts.
Primer is drying–if I get ambitious tonight, I’ll check to see how hard it’s dried and perhaps rivet the spars. I pulled out the VS parts the other night for fun–not much there compared to the HS, it should practically put itself together…
Also dabbed some primer in the drilled holes of the rear hinge brackets, which are made of steel, and cleaned the stickers off those parts. Everything’s laid out and ready to rivet once it dries. I’m going to take some time this afternoon to read through some other builder’s HS pages for tips.
Hours: 2.0 | Posted in Horiz. Stabilizer |
15th
June
2007
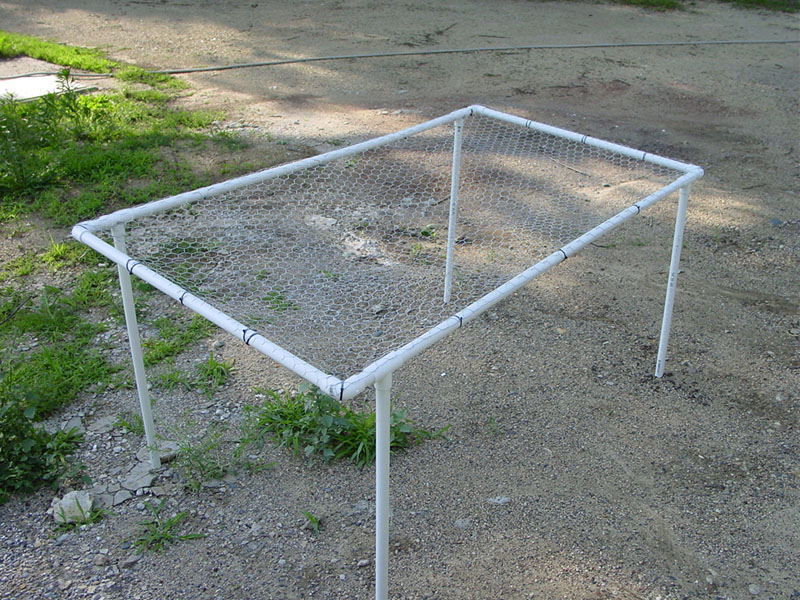
Bought parts for a priming table today: 5 sections of 3/4″ PVC and some elbows & tees, plus chicken wire (“poultry netting” in Menards-speak). Also picked up the $40 HVLP primer gun from Menards; I was dubious of its quality after the leaky filter & regulator I bought there, but it looks similar to the Harbor Freight model that gets rave reviews, and the store people say you can return it for any reason, so I figured I’d give it a shot.
I’ll be priming with the AFS system, which is a non-self-etching water-based primer/sealer. The benefits are that it has fewer environmental & health risks, and easy cleanup (pour leftovers back into the jar, cleanup with water; acetone or lacquer thinner for the dried up spots). It does require more prep than the self-etching primers (I considered the GBP-988 rattle can stuff), requiring a separate clean/etch step. I’ve read many good reviews on this product and traded emails with a couple users, and like what I have heard.
The etch process is simple: spray on the etch (cut 1:1 with water in a spray bottle), let it sit for a few minutes, then scrub with a scotchbrite pad. I did the entire HS (including skins) in under three hours tonight. I scrubbed just enough to turn the aluminum dull and remove any surface scratches. Rinse the parts in water (be careful; the wife might not be happy when she finds you in the shower with an HS skin) and check that it films evenly across the surface. All the parts are sitting in the shop drying; if the weather holds, I’ll prime tomorrow.

Hours: 3.0 | Posted in Horiz. Stabilizer |
3rd
June
2007
Deburred the remainder of the HS skins; found that a standard drill bit (large size) often works better in the #40 holes than the single-flute debur bit. I’d read of this previously in the forums; the culprit apparantly is the “nose” of the debur bit, which is nearly as large as the hole itself. I hadn’t been entirely happy with the deburring of the skin holes, so thought to try a twist drill, and it worked. So the SOP may become to use the bit for #40 holes, and the debur bit for larger.
Built the support table for the DRDT-2 dimpler, to hold the skins up at the level of the die. Turned out solid, and covered it with a towel to keep from scratching the skins. I’m noticing some scratches on the bottom side of the skins between holes from the dimpling process–I can’t see any sharp surfaces on the dimple die (I’m using the female side on the bottom), so not sure quite what’s happening here. One theory is that little bits of metal are stuck on the skin after deburring, and they catch on the die and scratch the skin as it drags over the top. Not sure; I’ll check the forums to see if this is a “known issue;” solved for the time being by supporting the skin up above the die as it’s being moved. I really like the DRDT-2 tool; easy to set up and lock into position, and easy to operate: Allison even said she was surprised at the amount of force it didn’t require. And quiet…though I’ve never used a standard C-frame, I can imagine how much less annoying this is…it borders on a good time!
So with this session, we’re ready for priming. Still haven’t ordered any primer, partly because of the cost (primer, etc, plus a gun, etc…), partly because I constantly second-guess my choices. I like the idea of Stewart Systems/AFS, but a self-etching something that can be found locally definitely would have its plusses… Trying to avoid the uber-toxic stuff, chromates & such. So now, I can either bite the bullet and decide (I suppose I could always change for the wings, as others have done, if it turns out to not be what I want), or start working on the VS. If the weather is decent, I’m trying to finish the siding on the shop, too.
Hours: 3.5 | Posted in Horiz. Stabilizer |
1st
June
2007
Deburring and scratch removal on the HS ribs & spars. Allison worked for a bit on the skins but her hands got tired after a bit–she finished the ribs and the inside of the left skin. After the deburring, I dimpled the ribs and countersunk the spars to accept the dimples. I started with the cordless drill for it’s speed control, but switched to the pneumatic when my arm tired of holding the big battery…much easier with the lighter tool, even without the speed control.
Wrapped up by marking rivet callouts on the plans, and countersinking the spar doublers. I need to check and see what to do with the holes marked “leave open for empennage fairing attach”–dimple, or not? I assume these will get nutplates at a later date (or pop rivets?); they are deburred but not dimpled on the skins & ribs.
Hours: 4.0 | Posted in Horiz. Stabilizer |